Joomla User Manual
Manual Index
Docker Setup
Setting Up a Local Joomla Environment using Docker
Getting Joomla running on your computer needs four things:
- downloading and configuring a web server Apache or nginx,
- a database service like MySQL or MariaDB,
- and surely we need PHP
- and Joomla.
To get all these different pieces to actually communicate with each other, most of us rely on bundled software like XAMPP, Laragon, or FlyEnv.
However, traditional setups can easily lead to port conflicts or database servers that mysteriously refuse to start. When a local server crashes, you might find yourself manually downloading and reinstalling entire Joomla sites over and over again just to test a single PR, potentially losing your work while fixing a bug. It consumes valuable time, and the fixes are usually just temporary band-aids.
The switch to Docker (Learn about Docker) With Docker, you can skip the manual configuration entirely. Instead of installing web servers directly onto your computer, you just write a single "recipe" file. Docker automatically downloads, isolates, and connects everything in the background. If something breaks, you don't reinstall your whole setup; you simply restart the container.
In this guide, you will learn the simplest way to get a local Joomla environment running using Docker, allowing you to spend less time fixing servers and more time contributing.
Prerequisites
You only need one thing installed before we start: Docker Desktop.
- Download it from docker.com and run the installer
- On Windows, leave the "Use WSL 2 instead of Hyper-V" option checked - it makes things faster
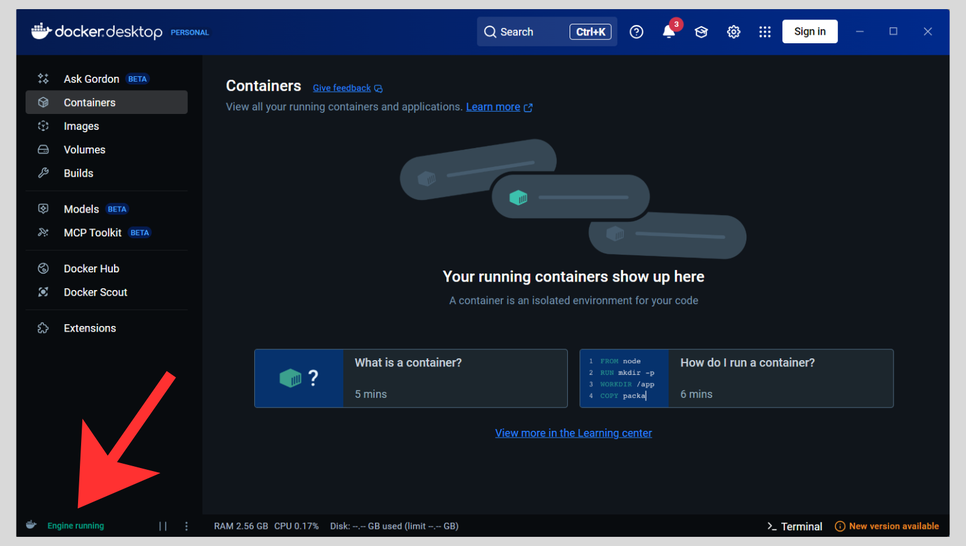
- Open Docker Desktop and wait until the bottom-left corner shows a green Engine running status.
That's it.
The docker-compose.yml File
When you need multiple services to communicate - like a web server
(Apache/Nginx), PHP, and a database (MySQL/MariaDB) - you use a special
orchestration file called docker-compose.yml. This file acts as the
blueprint for your project, defining all the services required and how
they collaborate. (The official Docker Joomla image is actually built on
top of a PHP and Apache image. This means that by using just this one
Joomla image, you get PHP, Apache, and Joomla all bundled together).
First, create a new folder on your computer for your project (for
example, on your Desktop, make a folder called joomla-docker).
Inside that folder, create a new text file and name it exactly this:
docker-compose.yml
Open that file in any text editor (like VS Code or Notepad), paste the following code exactly as it is, and save it:
    services:
      joomla:
        image: joomla:latest
        ports:
          - "8080:80"
        environment:
          - JOOMLA_DB_HOST=db
          - JOOMLA_DB_USER=joomla
          - JOOMLA_DB_PASSWORD=joomlapass
          - JOOMLA_DB_NAME=joomladb
        depends_on:
          - db
      db:
        image: mariadb:10.11
        environment:
          - MYSQL_ROOT_PASSWORD=rootpass
          - MYSQL_DATABASE=joomladb
          - MYSQL_USER=joomla
          - MYSQL_PASSWORD=joomlapass
        volumes:
          - db_data:/var/lib/mysql
    volumes:
      db_data:
Starting the Environment
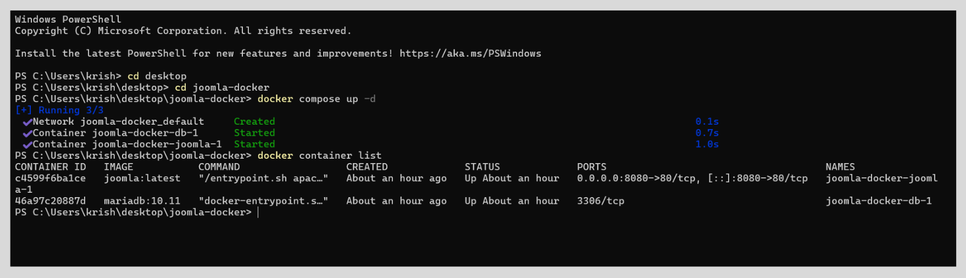
Open your terminal (or PowerShell on Windows), navigate to your joomla-docker
folder and run:
docker compose up -d
The first time you run this, Docker will download the Joomla and MariaDB images which might take a minute or two depending on your internet speed. After that, every subsequent start is almost instant as you can see below.
The Joomla Installer
Open your browser and go to http://localhost:8080. You should see the
Joomla installation screen.
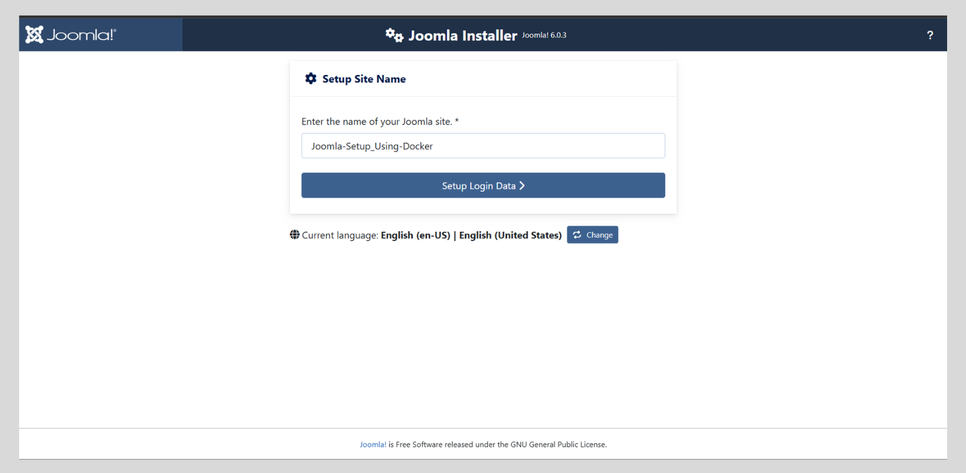
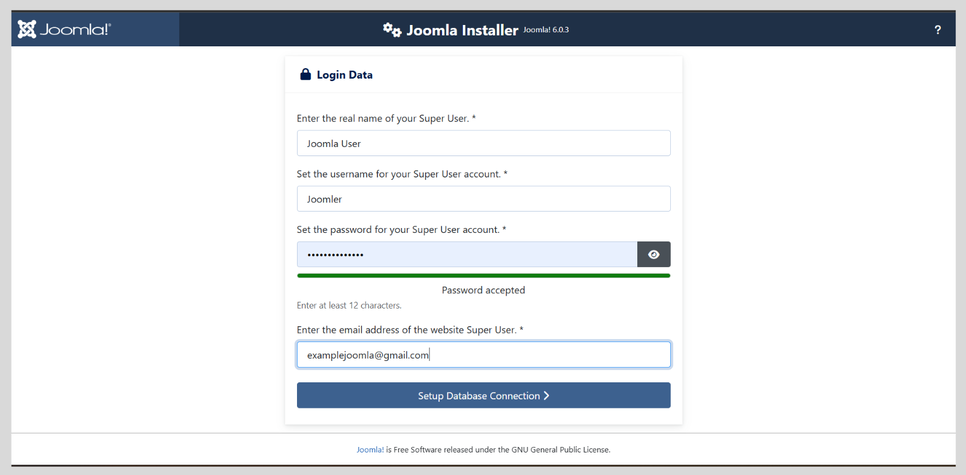
Fill in your site name and admin details on the first screen.
When you reach the Database Configuration screen, this is where most people get stuck:
Do not type localhost as the host name.
Because the database is running in its own container, Joomla needs the container's service name — not localhost. Use these exact values:
- Database Type: MySQLi
- Host Name:
db - Username:
joomla - Password:
joomlapass - Database Name:
joomladb
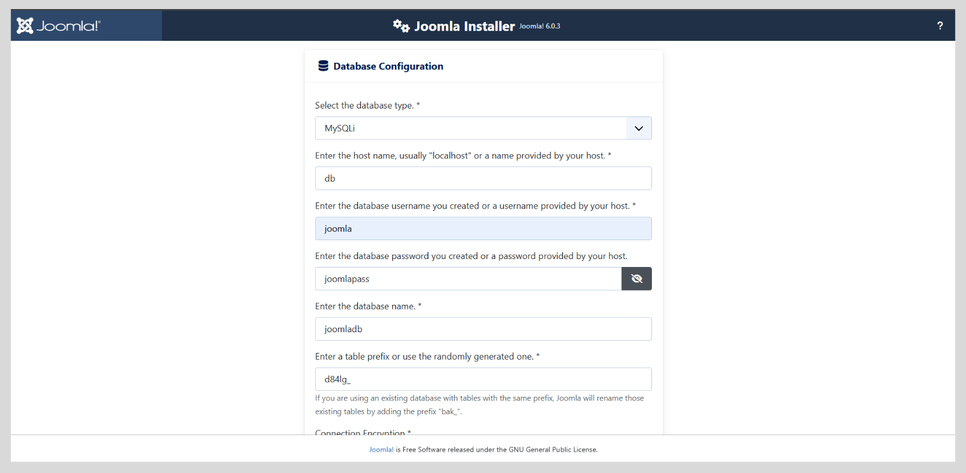
Click through, finish the installation, and you're done.
When you're finished working for the day, run docker compose stop to
pause the containers and free up memory. Your site will be exactly where
you left it next time.
Common Issues
- The page at localhost:8080 won't load right after starting: The database container takes a few seconds to finish initialising. Wait 30 seconds and refresh.
- Port 8080 is already in use: Change
"8080:80"to"8081:80"in the compose file and access it atlocalhost:8081instead. - Containers started but Joomla shows a database error: Double-check
that your Host Name in the installer is
dband notlocalhost.
Pro-Tip: Accessing the Joomla Files for Development
Right now, your Joomla site is running, but the actual PHP files are hidden inside the Docker container. If you want to contribute to Joomla, test PRs, or write your own plugins, you need those files on your computer so you can open them in VS Code or your favorite editor.
To sync the files from the container to your local hard drive, you just
need to add two lines(volumes: ) and (- ./site_joomla:/var/www/html)
to the joomla section of your docker-compose.yml file as shown below:
services:
  joomla:
    image: joomla:latest
    ports:
      - "8080:80"
    volumes:
      - ./site_joomla:/var/www/html
    # ... (rest of your settings)
What this does:
The next time you run docker compose up -d, Docker will automatically
create a folder called site_joomla right next to your compose file. It
will copy the entire Joomla core (including the administrator dashboard,
components, and templates) into that folder.
Any code changes you make in that folder on your computer will instantly update inside the running container! You are now fully set up for local development.
Bonus Tip 1: Testing Specific Joomla and PHP Versions
When testing PRs, maintainers will often ask you to test against specific PHP versions. With XAMPP, downgrading or upgrading PHP is a nightmare. With Docker, it takes two seconds.
Instead of using image: joomla:latest in your
docker-compose.yml, you can specify exact versions using tags. For
example, if you need to test Joomla 5.2 on PHP 8.3, just change
that one line to: image: joomla:5.2-php8.3-apache
Run docker compose up -d again, and Docker will instantly swap out
your server environment. You can find all the available version tags on
the Official Joomla
Docker Hub page.
Bonus Tip 2: Adding phpMyAdmin
If you are coming from XAMPP, you might miss having a visual
interface to look at your database. You can easily add phpMyAdmin to
your setup by adding a new service block to the bottom of your
docker-compose.yml file:
    phpmyadmin:
        image: phpmyadmin/phpmyadmin:latest
        ports:
          - "8081:80"
        environment:
          - PMA_HOST=db
        depends_on:
          - db
Restart your containers, and you can now access phpMyAdmin by going to
http://localhost:8081 in your browser. Just log in with joomla
as the username and joomlapass as the password.